Instruction Manual

Madera Series

Model STAF118/908

This page is the accessible web version of the printed instruction manual. It has the same instructions in the same order, and each diagram has a text description.

Components

Box Contents
No.Part
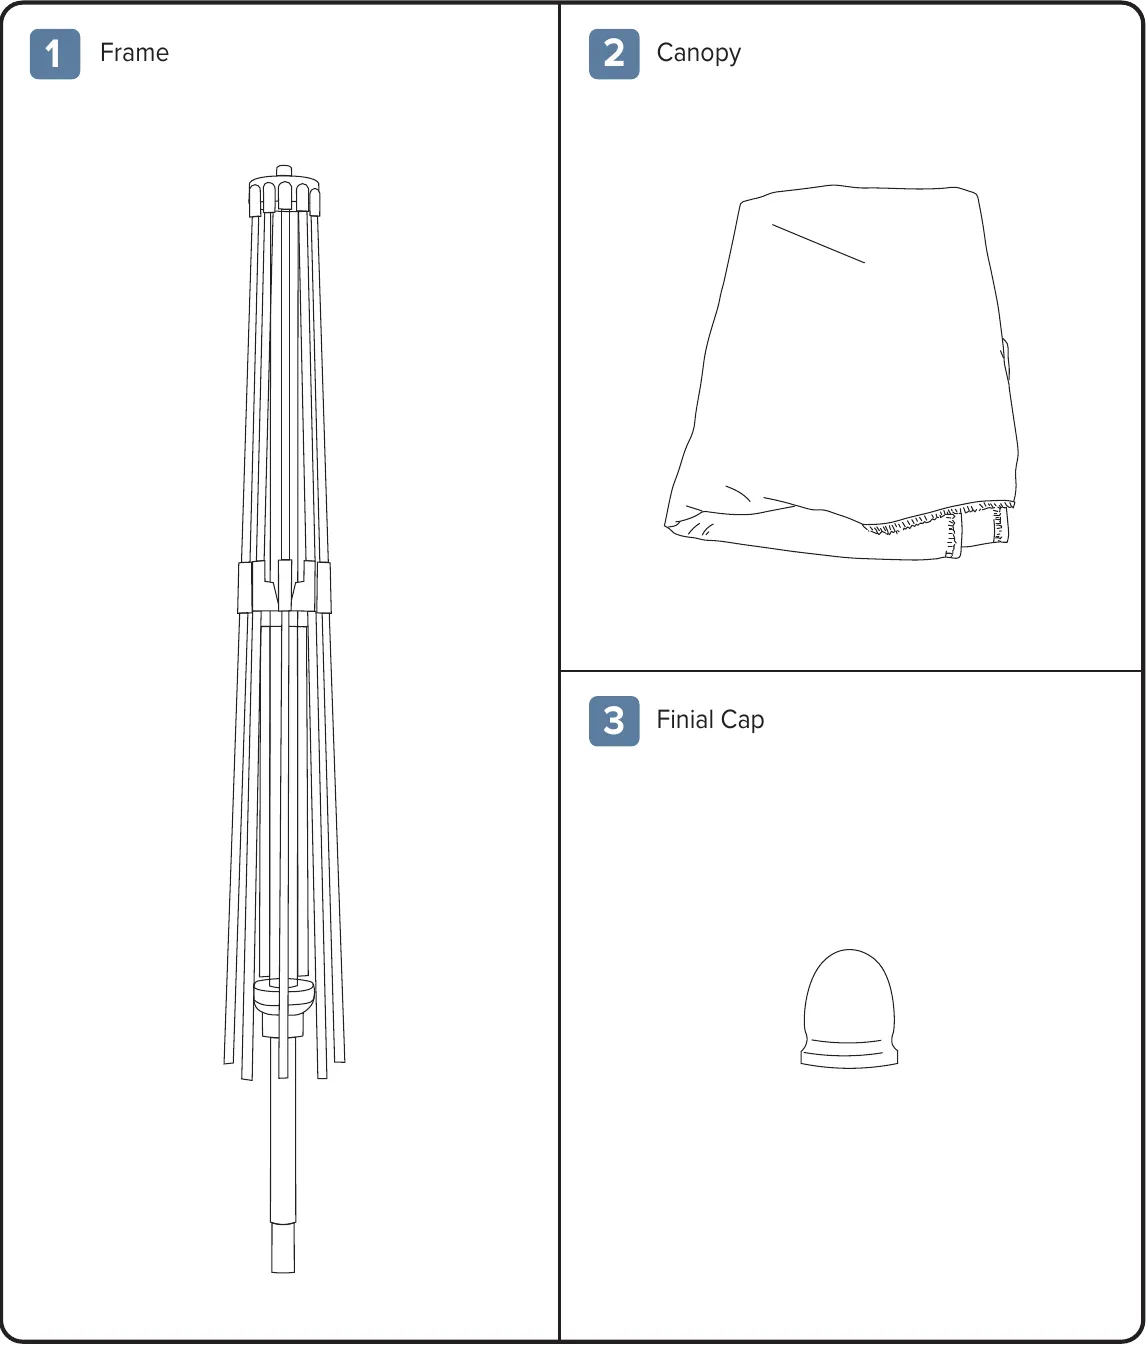
1Frame
2Canopy
3Finial Cap
Diagram: frame, canopy and finial cap
Box contents. 1, Frame: the umbrella frame with the ribs folded down along the pole and no canopy fitted. 2, Canopy: the folded fabric canopy. 3, Finial Cap: a small dome-shaped cap.

Canopy Assembly

  1. Place the umbrella frame on a stable, elevated surface with the top of the frame extending over the edge.
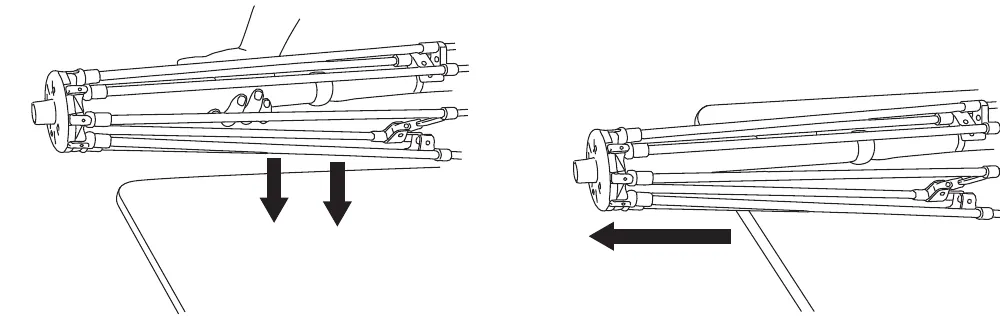
    Diagram: laying the frame on a table with the top over the edge
    Step 1. Left: hands lower the folded frame, lying on its side, onto a table (two downward arrows). Right: the frame resting on the table, with an arrow pointing toward its top end, which extends past the table edge.
  2. Unfold the canopy. Insert one arm underneath the canopy and locate the small opening at the center. Please note, the canopy should be inside out in this step.
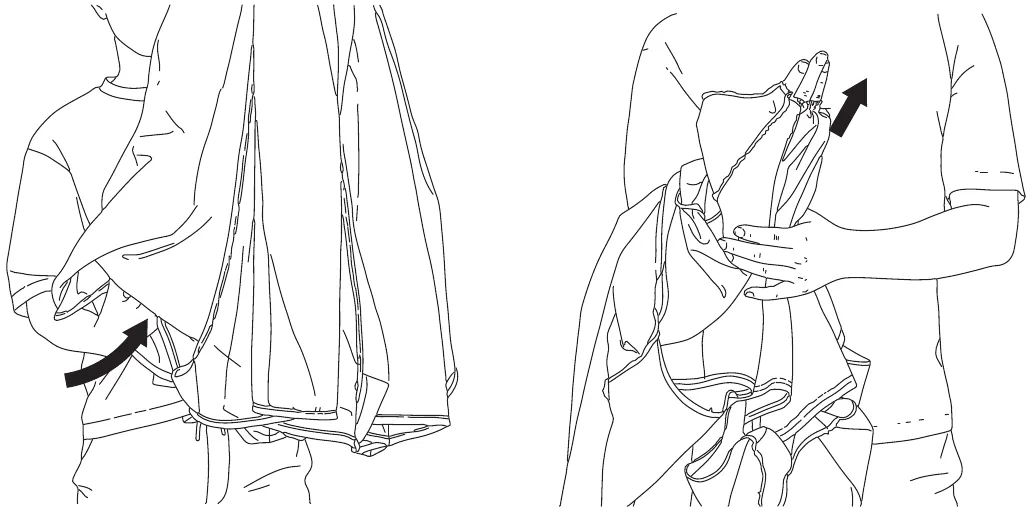
    Diagram: reaching inside the canopy to find the centre opening
    Step 2. Left: a person holds up the unfolded canopy and reaches underneath it with one arm (curved arrow). Right: the person's hand pushes up through the small opening at the centre of the canopy (upward arrow).
  3. Use the same hand that is inside the canopy to grip the protruding thread at top of the frame. While maintaining the grip, use the other hand to flip the canopy over the frame.
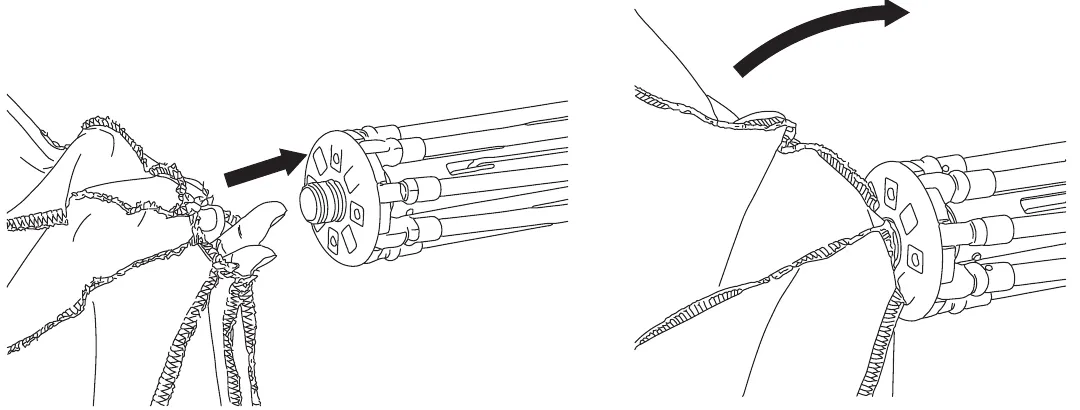
    Diagram: gripping the threaded top of the frame and flipping the canopy over
    Step 3. Left: the hand inside the canopy, coming through the centre opening, reaches toward the threaded post on the top of the frame (arrow pointing to the thread). Right: the canopy's centre opening is around the threaded post at the top of the frame, and a curved arrow shows the canopy being flipped over the frame.
  4. Adjust the small opening of the canopy until the threaded end is fully exposed. Screw the finial cap on clockwise to secure the canopy.
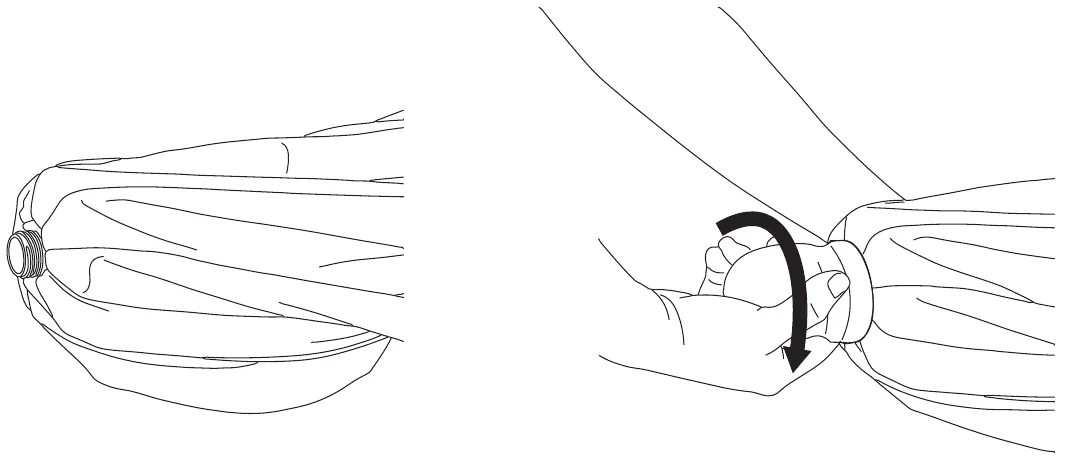
    Diagram: screwing the finial cap onto the exposed thread
    Step 4. Left: the canopy gathered over the top of the frame, with the threaded end showing through the centre opening. Right: a hand screws the finial cap onto the threaded end, with a curved arrow showing the turning direction.
  5. Temporarily lift the assembled frame and canopy to allow the canopy to fully drape over the frame.
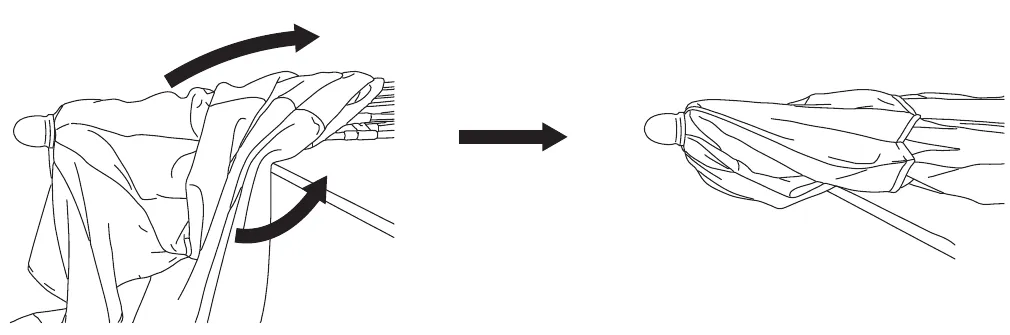
    Diagram: lifting the frame so the canopy drapes over it
    Step 5. Left: the frame on the table edge with the finial fitted; curved arrows show the frame being lifted and the canopy falling over it. An arrow points to the right-hand view: the canopy fully draped along the frame.
  6. Locate the rib pockets at the bottom of the canopy. One at a time, pull each pocket down and insert the corresponding rib to complete the assembly. To remove the canopy, follow these steps in reverse order.
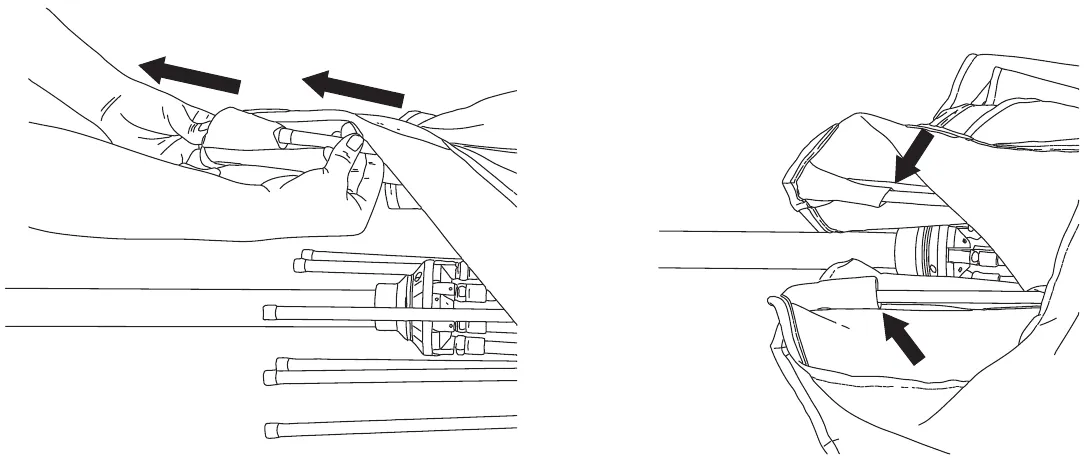
    Diagram: pulling a rib pocket over the end of a rib
    Step 6. Left: two hands pull a rib pocket at the canopy edge along the rib toward the rib's tip (two arrows). Right: close-up of the canopy edge, with two arrows pointing to the pocket fitted over the end of a rib.

Installation

Warning

  • Base is required for this umbrella and sold separately.
  • Umbrella should always be closed and secure with wind-tie in windy conditions
  1. Place the umbrella pole into a suitable, stable base (sold separately) that fits its diameter. Make sure the pole is fully inserted, then tighten any securing knobs or fasteners on the base to lock the frame firmly in place and prevent movement.
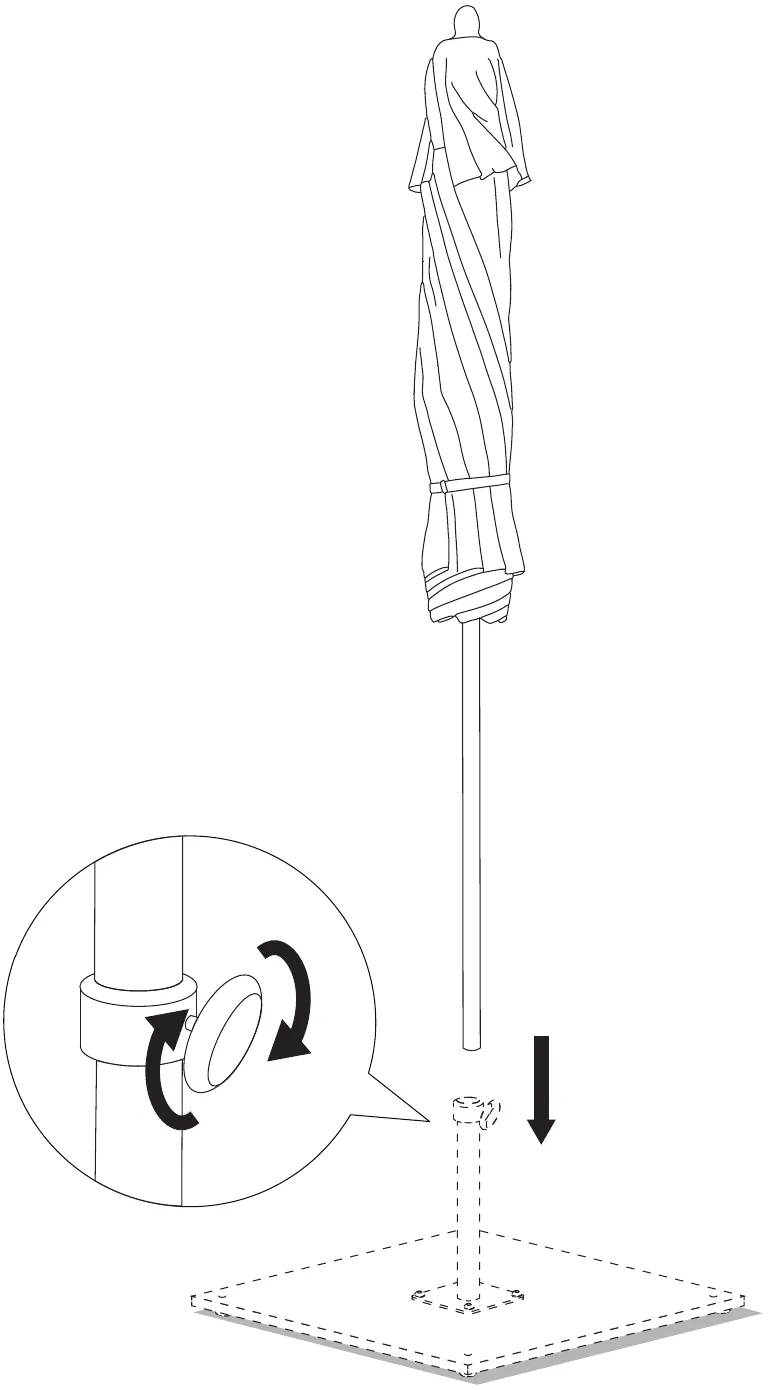
    Diagram: lowering the umbrella pole into the base
    Step 1. The closed umbrella, with a strap around the canopy, is lowered into the pole holder of a square base (downward arrow). The base is drawn in dashed lines (sold separately). An enlarged view shows the round knob on the side of the base's pole holder, with curved arrows indicating the knob being turned.

    Shop umbrella bases

Operation

Opening and Closing

Opening

Loosen the ribs so they are free to move. Stand beneath or beside the umbrella and pull the pulley rope downward to raise the hub. Once fully open, maintain firm grip on the rope and insert the attached locking pin into the pin hole. Loop the remaining rope on the hook.
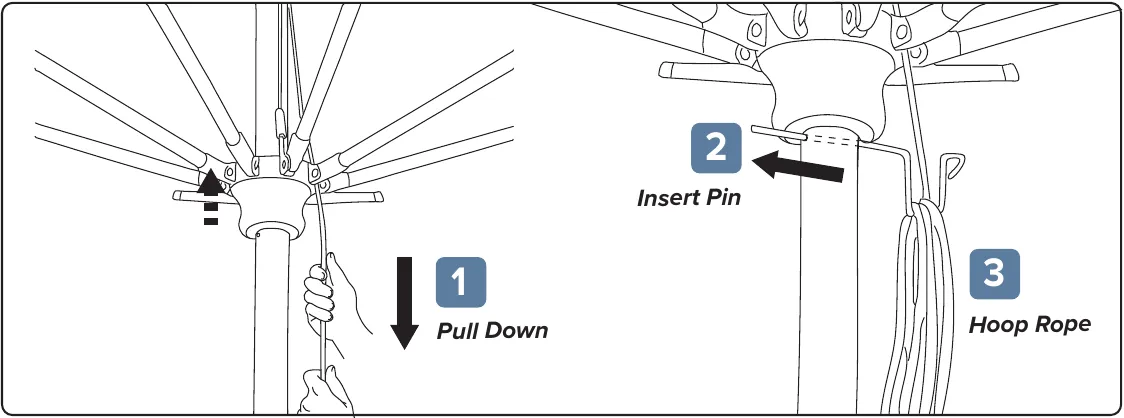
Diagram: pulling the rope, inserting the pin and hooking the rope
View from below the canopy. Left, callout 1, "Pull Down": hands pull the pulley rope down (downward arrow) and a dashed arrow shows the hub rising up the pole. Right, callout 2, "Insert Pin": an arrow shows the locking pin pushed sideways into the pole just below the hub. Callout 3, "Hoop Rope": the remaining rope hangs in loops on a hook on the pole.

Closing

Remove the pulley rope from the hook. Pull the rope downward slightly and remove the locking pin from the pin hole. Slowly release the pulley rope to lower the hub and collapse the canopy. To avoid injury, please operate slowly and carefully.
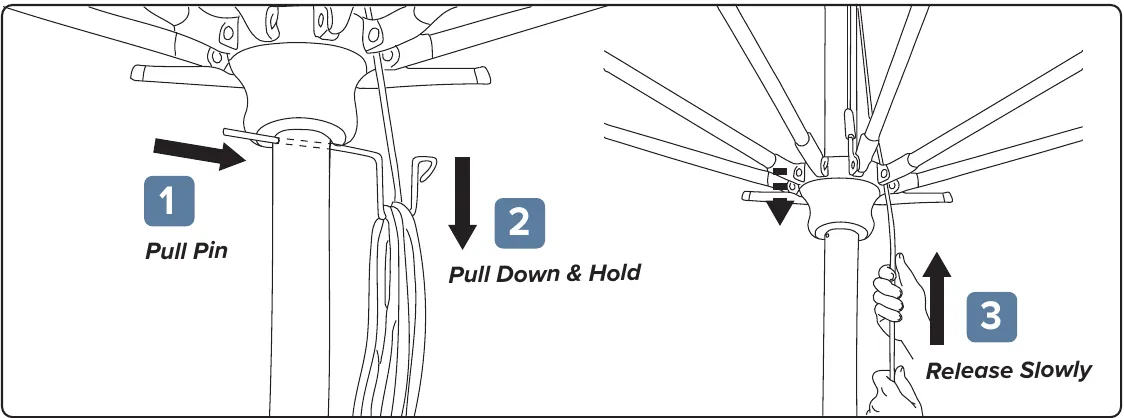
Diagram: pulling the pin, holding the rope and releasing it slowly
View from below the canopy. Left, callout 1, "Pull Pin": an arrow at the locking pin below the hub. Callout 2, "Pull Down & Hold": a downward arrow beside the rope. Right, callout 3, "Release Slowly": hands hold the rope with an upward arrow beside them, and a dashed arrow shows the hub moving down the pole.

Care & Maintenance

Care Tips

  • Use an appropriate base or anchoring system to secure the umbrella. Verify the recommended base weight for your specific model. A minimum base weight of 70 lbs is required to maintain warranty coverage in commercial use case settings and environments.
  • Ensure the umbrella pole is fully and securely inserted into the base before use. Tighten any base tightening knobs to secure the umbrella. Confirm the canopy is correctly positioned and evenly seated on all frame ribs before opening.
  • For umbrellas with a pin-stop collar: start at the lowest pinhole for everyday functional use. As fabric naturally stretches over time, a higher pinhole can be used for a tighter, more aesthetic fit — however, a looser fitting is recommended in commercial & breezy conditions, as it allows the fabric to flex with the wind and improves long-term durability.
  • The base or anchor for the umbrella must rest on a flat, stable surface. Always move the umbrella by fully closing, uninstalling, and lifting/placing in the desired area — never drag or reposition while open.
  • You may add a fabric defense to your canopy for an added layer of protection against oil and water-based stains if desired. Visit our website to purchase a bottle of Pacifica Preserve and Protect Fabric Defense.

General Warnings

  • A minimum base weight of 70 lbs is required to maintain warranty coverage for anchor-related incidents. Always verify the recommended base weight for your specific umbrella model.
  • May cause damage or injury when used improperly.
  • Not meant for use in windy or inclement weather conditions. Always close and secure the umbrella before any high-wind event or storm.
  • When not in use, close the canopy, cover, and store outdoor furniture in a dry and clean area.
  • Do not use harsh cleaning products on the surface of your frame or canopy.

How to Clean

  • Frame
    • To keep the frame looking its best, wipe with a clean damp cloth and a solution of mild soap and water¹. Dry thoroughly with a clean dry cloth. While the canopy is installed, use a soft bristle brush to regularly remove loose dirt, leaves, and debris.
    • To remove water spots, scrub the frame with a clean cloth or soft bristle brush using a solution of white vinegar and water². Dry thoroughly with a clean dry cloth.
  • Canopy
    • While the canopy is installed, use a soft bristle brush to regularly remove loose dirt, leaves, and other debris from the fabric.
    • For spills and stains, spray a mild cleaning solution of mild soap and water¹ and scrub with a soft bristle brush or clean cloth.
    • For more severe cases, use Pacifica: Restore and Renew Fabric Cleaner. Spray 10 inches from the surface, scrub with a soft bristle brush, and thoroughly rinse with clean water.
    • Machine Wash Cold and Air Dry Only.
  • Cleaning Solution
    • Mild Soap and Water¹: ¼ cup mild soap : 1 gallon water
    • White Vinegar and Water²: 1 cup vinegar : 1 cup water

Warranty

Overview

California Umbrella offers limited warranty gives you specific legal rights and you may also have other rights, which vary from state to state.

This limited warranty can also be found at www.californiaumbrella.com/en/terms-of-sales and in the documentation we provide with the products.

We warrant that during the warranty period, the individual components of the products purchased from the site will be free from defects in materials and workmanship.

We limit the duration and remedies of all implied warranties, including without limitation the warranties of merchantability and fitness for a particular purpose, to the duration of this limited warranty.

Our responsibility for defective products is limited to repair, replacement or refund as set forth in this warranty statement. Neither any performance or other conduct, nor any oral or written information, statement or advice provided by us, our agents, or employees will create a warranty, or in any way increase the scope or duration of this limited warranty.

Frame

This California Umbrella frame comes with one (1) year; Fiberglass Ribs are warranted for Three (3) years; If a residential grade umbrella is used for commercial purposes, then the warranty is reduced to Ninety (90) days.

Fabric

This product offers various limited warranty based on the fabric selection:

  • One (1) year limited warranty for Olefin Fabrics
  • Four (4) years for Pacifica Fabrics
  • Five (5) years warranty for Sunbrella Upholstery Fabrics
  • Ten (10) years for Sunbrella Awning Fabrics

Email service@marchproducts.com for warranty instructions

Questions about your product? Contact us or chat with us on californiaumbrella.com.

All product guides